This guide shows you how to navigate through the Galaxy Note 4 camera app interface and how to customize the shortcut menu in the interface.
Samsung tried to simplify the Galaxy Note 4 camera app interface, but some Galaxy Note 4 owners still feel it is a bit complicated. Therefore, this guide here is to assist you.
Once you start the camera app, you are ready to take pictures by tapping the camera button on the right side, as shown below.
You can also start to record a video by tapping the camcorder icon.
Of course, you can change Galaxy Note 4 camera modes by tapping the Mode button.
In the bottom right, indicated in the pink rectangle, you can find the shortcut to the Gallery app. By default, the last taken photo is shown as a thumbnail there. You can tap it to review the photo.
In the top right, there are some icons (in the yellow box as shown below). These icons indicate the current status or enabled features in the camera app. For example, in the screen shown below, from left to right, the meaning of the four icons is:
- Night mode activated. The camera detected that the lighting condition was close to night. Please note the Galaxy Note 4 camera app does not have a separate night mode. If you choose Auto mode, the Galaxy Note 4 camera can switch to night mode automatically based on lighting conditions.
- Voice control is enabled. You can use your voice to control the camera to take photos or record videos. Please check this guide on how to use voice commands to take photos or rerecord videos in Galaxy Note 4.
- The storage location is the micro SD card. Photos (except in burst mode) and videos will be saved to the micro SD card, not phone storage. You may refer to this guide on how to set the storage location for the Galaxy Note 4 camera.
- Galaxy Note 4 is being connected to a charger (or an external battery).
Of course, the icons in this location depend on the features enabled and some other settings.
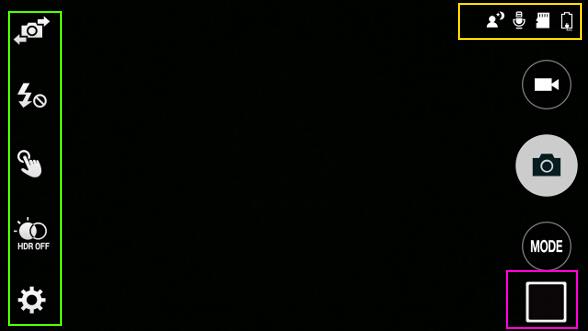
In the left side of Galaxy Note 4 camera app interface, you can find the shortcut menu (indicated in the green box as shown in the screenshot above).
You can quickly toggle on/off the corresponding settings without go to camera settings.
By default, there are 3 items there (from top to bottom): Switch between front and rear camera, HDR on/off, and Settings icon.
Of course, in the screenshot above, there are 5 items because after finishing this guide, you will add two more items to the shortcut menu
The shortcut menu in Galaxy Note 4 camera app interface can only hold up to 5 items.
The first (switching between front and rear cameras) and the last one (settings icon) cannot be changed.
So, you can customize up to 3 items in the shortcut menu.
To customize shortcut menu in Galaxy Note 4 camera app interface, you may follow these steps.
Step 1: Start camera app in your Galaxy Note 4.
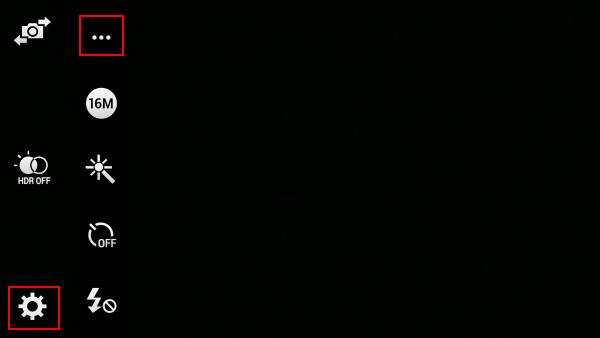
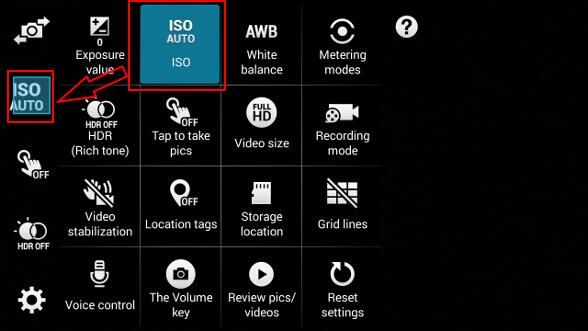
Step 2: Tap Settings–More in the Galaxy Note 4 camera app interface as shown below.
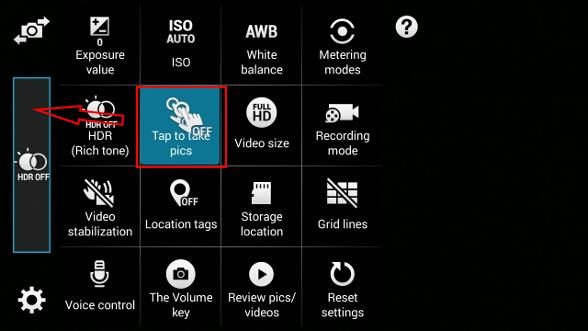
For example, we want to add Tap to take pics (which allows you to tap anywhere on the screen to take photos, in addition to the camera button) to the shortcut menu.
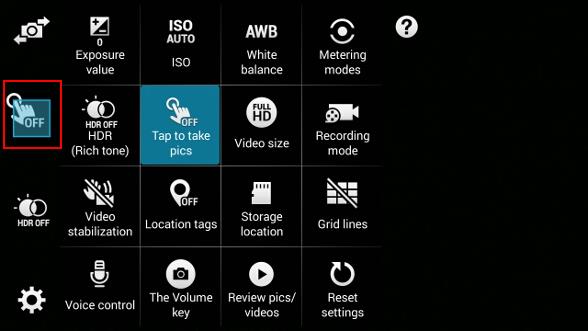
So, tap and hold Tap to take pics, move and drop it to the shortcut menu area as shown in the following two screenshots.
If you want, you can similarly add ISO settings to the shortcut menu as shown below.
Once all 5 slots in the shortcut menu are occupied, you can then only replace existing items.
For example, you want to use Flash control to replace ISO settings.
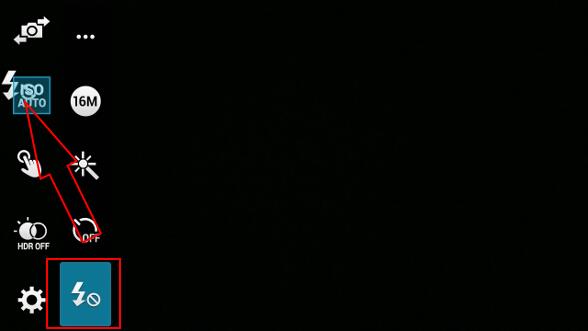
Tap and hold the flash control icon, drop it the ISO settings in the shortcut menu as shown below.
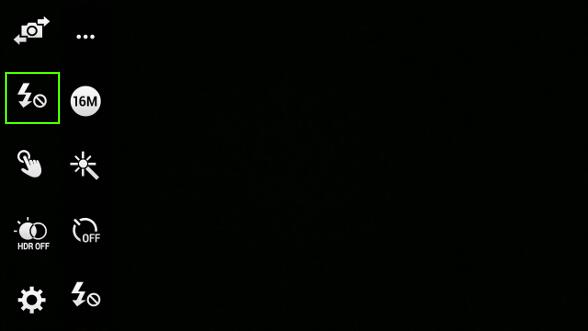
Once you drop the camera flash control over the ISO settings, you will notice the ISO setting is replaced with the camera flash control icon.
Please note, the first row in the settings cannot be customized.
Also, after adding an item to the shortcut menu in the Galaxy Note 4 camera app interface, the item is still in the original location of the settings. This is the reason why it is called “shortcut”.
Step 4: Tap any where to return to Galaxy Note 4 camera app interface.
In Galaxy Note 4 camera app interface, now you can tap the shortcuts to turn/off the feature.
If you have any problems or questions on how to customize Galaxy Note 4 camera app interface (and shortcut menu), please post them in the comment box below.
We will try to help you find a solution.
More how-to guides , tips and tricks for using Samsung Galaxy Note 4 are available at Galaxy Note 4 how-to guides page.
Jim says
How do I get the flash to work? I have it on auto & photos are great in most situations but not at night.
Galaxy Note says
There are 3 options for the flash: off, on and auto. When you find auto mode doesn’t weekend well, you can turn it on so it will be activated all the time. Of course, you need to turn it back to auto after that.
Our Facebook page || Galaxy S6 Guides || Galaxy S7 Guides || Android Guides || Galaxy S8 Guides || Galaxy S9 Guides || Google Home Guides || Headphone Guides || Galaxy Note Guides || Fire tablet guide || Moto G Guides || Chromecast Guides || Moto E Guides || Galaxy S10 Guides || Galaxy S20 Guides || Samsung Galaxy S21 Guides || Samsung Galaxy S22 Guides || Samsung Galaxy S23 Guides
Anita Tigner says
Why do I repeatedly get “camera failed” when I try to open my camera? If I close the camera app and reopen it will work. I have tried running a factory reset and still had the same issue.
Simon says
If you install another camera app (e.g., Google camera), do you get similar issue when launching this camera app?
Our Facebook page || Galaxy S6 Guides || Galaxy S7 Guides || Android Guides || Galaxy S8 Guides || Galaxy S9 Guides || Google Home Guides || Headphone Guides || Galaxy Note Guides || Fire tablet guide || Moto G Guides || Chromecast Guides || Moto E Guides || Galaxy S10 Guides || Galaxy S20 Guides || Samsung Galaxy S21 Guides || Samsung Galaxy S22 Guides || Samsung Galaxy S23 Guides
Mariano says
I’m trying to figure out if there’s a way to create a quick access shortcut (to place on the home screen) to record video without having to install any additional apps. Any ideas?
Thank you
Simon says
As I know there is no camera widgets for this.
Our Facebook page || Galaxy S6 Guides || Galaxy S7 Guides || Android Guides || Galaxy S8 Guides || Galaxy S9 Guides || Google Home Guides || Headphone Guides || Galaxy Note Guides || Fire tablet guide || Moto G Guides || Chromecast Guides || Moto E Guides || Galaxy S10 Guides || Galaxy S20 Guides || Samsung Galaxy S21 Guides || Samsung Galaxy S22 Guides || Samsung Galaxy S23 Guides